


I've been mildly interested in trying some natural dyeing. It's one of those things I thought I should at least try even though a. I am not really a bright color person and b. we have sheep of all sorts of pretty colors...without the need for any additional chemicals. Well, sometimes alcohol... ;-)
In my limited research I found that walnuts create the only natural dye that does not require an additional mordant, so between that and the excellent walnut crop we have this year figured that was a good place to start. I gathered a couple buckets full of still green walnuts from one of our trees, a couple of neighbors, church and Reg brought some over from Clark county.

I asked Saint Tim for help breaking the hulls off. And to think I was just going to drive over them willy nilly... This actually worked quite well. Of course.

They were much juicier than I thought they'd be.

One trip under the car wheels and the mostly still intact nuts were easy to remove. Apparently you can leave the nuts in, but it will ruin them. At least this way I can toss them back to whatever animals need them for food this fall.

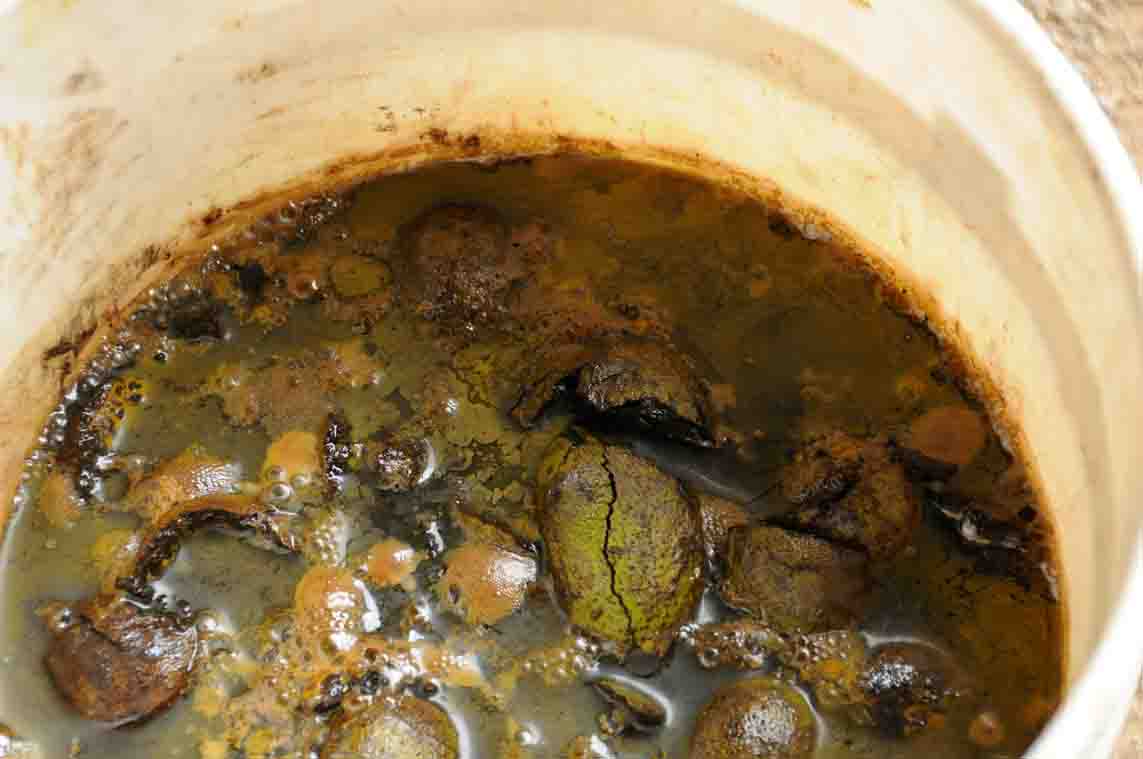
I collect rainwater off the wool house roof so used that to soak the hulls overnight instead of city water that "may" contain some chemicals that might influence the color.

The next morning Stella and Reg came over and set up shop in the barn. Anything that needs cooking around here needs either Stella or Reg ;-). We cooked two pots full - one on the double burner and the other with a submersible bucket heater - for about an hour and a half. As the green hulls cooked, they turned dark brown, as did the water.

Two things Reg picked up at the hardware store that I can't recommend strongly enough - paint bucket strainer bags that fit over a five gallon bucket and insulated rubber gloves.
We poured the cooked hulls into the strainer bags, squeezed out as much water as we could and then used a heavy metal strainer - something a fellow beekeeper probably "invented" and you probably can't buy, but if you can, is another must have.

That huge bucket of hulls smashed down into this compact bundle.

We picked out four different wools to experiment. That's red Marcel, white Clun Forest, gray Jacob and white something soft/Hampshire cross.

We put a loose bundle (2 oz) in each lingerie bag and started out with two bags in the first batch. It looked like a lot of wool, but once it settled into the water we realized we could probably do more than four ounces at a time.
We also pre-soaked the first batch in heated rain water, but did not do that on any subsequent batches.
And we added some Keebler curls to the very top as an afterthought, but continued to add a small handful of wool on top of every batch because that made it easy to look and see how dark the wool was getting.

We then set the strained bag of hulls on top, put the lid on and barely simmered the pot for about 45 minutes.
________________________________________
Important disclaimer - I'm just documenting what we did as a first time dyeing experiment. I'm not in any way saying we were doing this the right or best way. It did work though and I'll continue this on tomorrow.
In my limited research I found that walnuts create the only natural dye that does not require an additional mordant, so between that and the excellent walnut crop we have this year figured that was a good place to start. I gathered a couple buckets full of still green walnuts from one of our trees, a couple of neighbors, church and Reg brought some over from Clark county.

I asked Saint Tim for help breaking the hulls off. And to think I was just going to drive over them willy nilly... This actually worked quite well. Of course.

They were much juicier than I thought they'd be.

One trip under the car wheels and the mostly still intact nuts were easy to remove. Apparently you can leave the nuts in, but it will ruin them. At least this way I can toss them back to whatever animals need them for food this fall.
I collect rainwater off the wool house roof so used that to soak the hulls overnight instead of city water that "may" contain some chemicals that might influence the color.

The next morning Stella and Reg came over and set up shop in the barn. Anything that needs cooking around here needs either Stella or Reg ;-). We cooked two pots full - one on the double burner and the other with a submersible bucket heater - for about an hour and a half. As the green hulls cooked, they turned dark brown, as did the water.

Two things Reg picked up at the hardware store that I can't recommend strongly enough - paint bucket strainer bags that fit over a five gallon bucket and insulated rubber gloves.
We poured the cooked hulls into the strainer bags, squeezed out as much water as we could and then used a heavy metal strainer - something a fellow beekeeper probably "invented" and you probably can't buy, but if you can, is another must have.

That huge bucket of hulls smashed down into this compact bundle.

We picked out four different wools to experiment. That's red Marcel, white Clun Forest, gray Jacob and white something soft/Hampshire cross.

We put a loose bundle (2 oz) in each lingerie bag and started out with two bags in the first batch. It looked like a lot of wool, but once it settled into the water we realized we could probably do more than four ounces at a time.
We also pre-soaked the first batch in heated rain water, but did not do that on any subsequent batches.
And we added some Keebler curls to the very top as an afterthought, but continued to add a small handful of wool on top of every batch because that made it easy to look and see how dark the wool was getting.

We then set the strained bag of hulls on top, put the lid on and barely simmered the pot for about 45 minutes.
________________________________________
Important disclaimer - I'm just documenting what we did as a first time dyeing experiment. I'm not in any way saying we were doing this the right or best way. It did work though and I'll continue this on tomorrow.
11 comments:
That is one nasty looking stew!!
I can’t wait to see the end result of the ingenuity and efforts of the four of you, especially Keebler’s curls.
I too have walnuts soaking. Going to try some superwash wool in the first batch. Also have some mushrooms soaking. Not sure how that will go. Want to try lichens.
Now this could get interesting. Can't wait to see the end results.
I can't wait to see the finished wool! I loved the colors before you even dyed them.
We have enough walnuts for a dye factory. An interesting process...can't wait to see how it worked.
I've been thinking of trying this with our ample walnut crop, can't wait to see your results!
Very fun! I can't wait to see the results. I may have to go pick some walnuts :)
A Cliff hanger!! I can't wait to see the finished products!
kim
Onion skins do not require a mordant either. You can get nice yellows, oranges and browns.
The metal of the pan you uses can also "push" the color one way or another...
As a rule, iron in pot or water dulls/darkens. But that probably won't be an issue with the walnuts!
I've been wanting to try that for awhile. Will be interesting to see the end result.
Post a Comment